It took some time for me to full appreciate how to fine-tune my P200-6X Lycoming P-mags. I’m putting together this page to help others get up to speed more quickly.
Information:
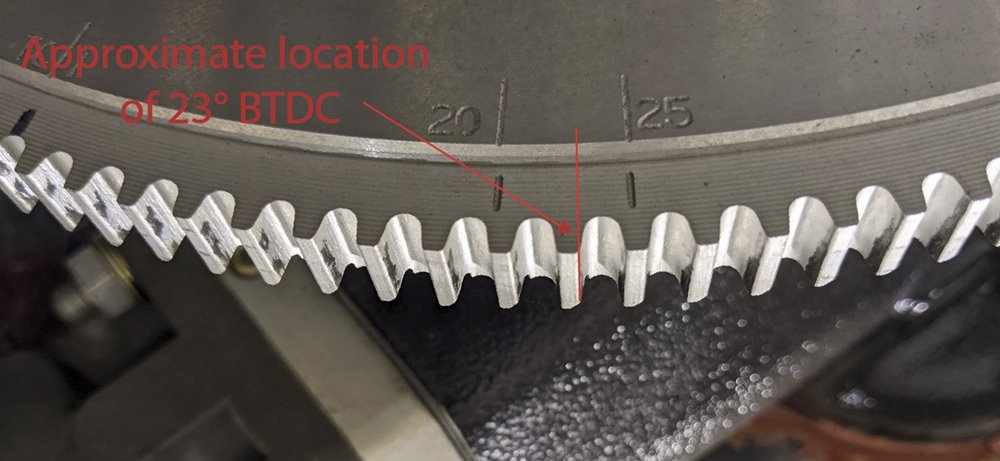
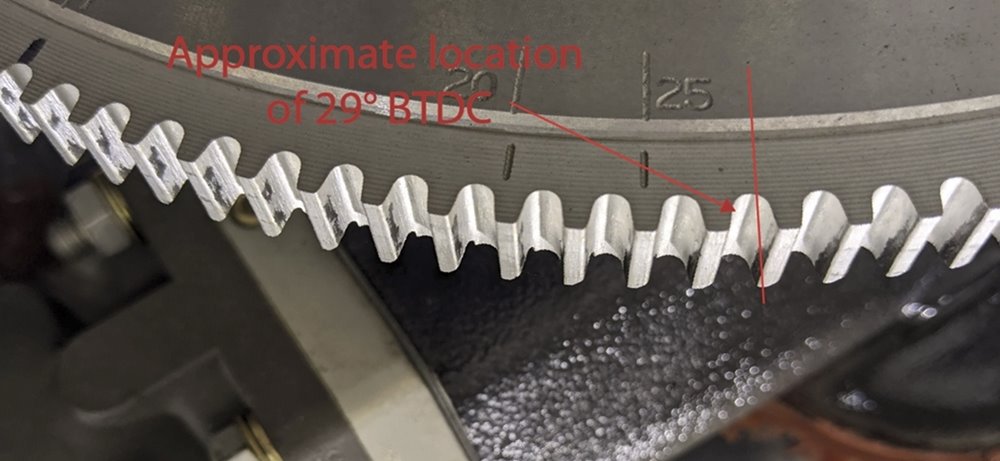
I have been most please with settings of 23° BTDC (MIN) and 29° BTDC (MAX), but you will want to experiment to determine your optimum values
CHT will increase with a higher MAX setting
DanH on VAF recommends MAX does not exceed 34° BTDC
Setting the Right P-Mag
1. Remove all top spark plugs
2. Using your thumb over the spark plug hole of Cylinder 1 rotate the propellor counter-clockwise (rotation engine runs) until approaching TDC
3. Slowly rotate until the positioning mark on the starter aligns with the TC 1 marking on the ring gear
4. Twist off the Right P-Mag connector
5. Press and hold the Right P-Mag Configuration button
6. Reconnect the Right P-Mag connector
7. Continue hold until LED turns BLUE – then release (LED will start blinking BLUE/GREEN)
8. Press/hold Right P-Mag Configuration button for 6 seconds, until LED turns WHITE – then release
NOTE: TC is now stored. Ignition will reboot in normal mode and settle at YELLOW (Blue/Green cycling) LED with tone
9. Rotate the propellor to Cylinder 1 TDC and the continue rotation to confirm that the P-Mag LED is Yellow with a tone when back to TDC, if not repeat steps 2-8
Repeat for the Left P-mag
NOTE: To get the Left P-mag to time correctly to TDC, I find that I must set the position to be 1/3 of a tooth BEFORE TDC
NOTE: It ALWAYS takes me 1-5 tries with tiny adjustments to get the TDC (and MIN/MAX) set points to be in the correct position
Setting the MIN set point
NOTE: The P-Mag default is 20° BTDC, however on my IO-540-D4A5 the timing plate identifies 25° BTDC. Vic Syracuse and Mike Busch both agree that a couple degrees retarded is acceptable and appears to run better on the IO-540 engines
1. Using your thumb over the sparkplug hole of Cylinder 1 rotate the propellor counter-clockwise (rotation engine runs) until approaching 20° BTDC
2. Slowly rotate until the the P-Mag LED is BLUE
3. Press and hold the Right P-Mag Configuration button
4. Rotate the propeller to 23° BTDC
5. Release the Right P-Mag Configuration button
6. Rotate the propellor to Cylinder 1 TDC and the continue rotation to confirm that the P-Mag LED is BLUE when back to 23° BTDC, if not repeat steps 2-8
Repeat for the Left P-mag
NOTE: To get the Left P-mag to time correctly, I find that I must set the position to be 1/3 of a tooth BEFORE 23° BTDC
Setting the MAX set point
1. Using your thumb over the sparkplug hole of Cylinder 1 rotate the propellor counter-clockwise (rotation engine runs) until approaching 32° BTDC
2. Slowly rotate until the the P-Mag LED is WHITE
3. Press and hold the Right P-Mag Configuration button
4. Rotate the propeller to 29° BTDC
5. Release the Right P-Mag Configuration button
6. Rotate the propellor to Cylinder 1 TDC and the continue rotation to confirm that the P-Mag LED is WHITE when back to 29° BTDC, if not repeat steps 2-8
Repeat for the Left P-mag
NOTE: To get the Left P-mag to time correctly, I find that I must set the position to be 1/3 of a tooth BEFORE 29° BTDC
Check Mag Firing Positions
1. Rotate engine 1 or 2 turns then to Cylinder 1 TDC
2. Check TDC YELLOW LED with tone
3. Check that the LEFT and RIGHT P-Mags are within 0.5° of each other (1/5th of a gear tooth)
3. Check 23 degrees (min) WHITE LED
4. Check 29 degrees (max) BLUE LED
No Comments